5 Tips to Use Edge Panels on Your Samsung Phone Like a Pro
5 Tips to Use Edge Panels on Your Samsung Phone Like a Pro
Edge panels are among the most useful features on Samsung Galaxy phones. Here are five ways you can get even more from them.
How to Sync Data Across Microsoft Excel Documents
How to Sync Data Across Microsoft Excel Documents
You can set up Excel to automatically import data from one file to another, which is a great feature for creating summary spreadsheets. Here's how!
How to Convert a PowerPoint Presentation to Google Slides
How to Convert a PowerPoint Presentation to Google Slides
Want to convert your PowerPoint presentations and open them in Google Slides? Here's how to do it easily.
A Guide to WhatsApp Video Calling: Everything You Need to Know
A Guide to WhatsApp Video Calling: Everything You Need to Know
WhatsApp video calling enables user-to-user video chat. Here's everything you need to know about communicating over live video using the app.
WhatsApp connects users all around the world. The app allows people to communicate through text messages, voice, or by using WhatsApp video calling. And like any instant messenger, WhatsApp's video calling is feature-rich.
Here's a guide on how to make WhatsApp video calls on desktop and mobile, as well as everything you need to know about its limits.
WhatsApp Video Calling? You Need to Know This
Video calling is precisely what it sounds like. You “call” a contact you have on WhatsApp, and both of you can see each other on your smartphone screens. It's what Skype and FaceTime have been doing for years.
Video calling on WhatsApp also works across both Android and iOS. That's what makes WhatsApp one of the best smartphone apps for cross-platform video calls. If you have any security concerns, check out these tips to make WhatsApp more secure and private.
WhatsApp video calls are free locally and internationally, meaning that WhatsApp isn't charging you any money to make the call. However, video calls require an internet connection, so they consume data from your phone's data plan;
If you are using WhatsApp to call someone over a Wi-Fi connection, your phone's network carrier won't charge you anything.
A quick reminder: you can check how much data WhatsApp video calls use, thanks to these WhatsApp tricks everyone should know. And to ensure you get all the features, download the latest version of WhatsApp.
What You Can Do With WhatsApp Video Calling
WhatsApp video calling is part of the existing voice calls feature. You can contact old friends who use the app and chat as though they were sitting in front of you.
You can hold business meetings, work with small teams, and even keep in touch with friends in other countries. WhatsApp's features are all exceptionally robust.
How to Make a WhatsApp Video Call on Mobile
Placing a WhatsApp video call on your phone is quite simple. Here's how:
- First, tap the Contact you want to talk to.
- Now tap the Video Camera icon to the right of their name at the top of the screen. The other person can answer the call by tapping the green Video button or reject the call by tapping the red Phone button. If they answer, you're ready to go.
By default, WhatsApp video calls use the front-facing camera of your phone. However, you can switch this to the rear Camera at any point with a tap on the screen. It's seamless and just works.
You can also mute the microphone, so the other person can see you but not hear you—just tap the Microphone icon at the bottom of the screen. To mute the audio from the speakers, use your phone's volume buttons.
How to Make a WhatsApp Video Call on Your PC
Making a WhatsApp video call on your PC is just as easy. Follow the steps below to get started:
- Launch WhatsApp Desktop on your PC and select the Contact you want to call.
- Next, click on the Video Camera icon at the top-right of the screen. You will then see your face and that of the person you're calling displayed in a small window in the top-right corner of the screen, with your chat in the background. You can maximize the display to get a better view of yourself and of the person you're calling.
- At the bottom of the video call display are options to toggle your Camera on or off, turn your Microphone off, and End the call. Tap the three-dot Menu to access WhatsApp video call Settings to adjust your preferences.
Unlike on mobile, you can view your other Chats on the left side of the screen while on a video call on your PC.
Group WhatsApp Video Calls
You can make a WhatsApp video call with up to eight participants at the same time. That means you can chat to seven friends or loved ones all in one call. Group video calls consume more data as well.
How to Place a WhatsApp Group Call on Your Mobile
Here's how to place a WhatsApp group call on your phone:
- First, start a one-on-one call with anyone on your contact list. Then tap the Video icon next to their name.
- If you want to add more people once the person has answered the call, swipe up on the upward Arrow above the in-call options buttons and tap Add Participant. The icon looks like a person with a plus sign next to them at the bottom of the screen.
- Now select the Contacts you want to call, and repeat for up to seven additional people.
- If you want to place a call from within a group chat, open the chat and tap the Camera icon in the top-right corner. This will call everyone in the chat simultaneously.
The process is simple and easy. You just need to ensure that everyone else you're adding to the video call has WhatsApp. Currently, you cannot place a group video call on your PC, but that may change in the future.
Multitasking While on a WhatsApp Video Call
Another highlight of WhatsApp's video calls is the multitasking feature. Most smartphone video calls force you to use the video call and prevent you from using anything else, meaning you can't multitask. However, WhatsApp has no such restrictions.
On your phone, you can tap the back Arrow in the top-left corner of the screen to check other messages that someone has sent you on WhatsApp and even reply to them. To return to your video call, just tap the green Bar at the top of the screen.
On your PC, click on the background to access the contacts you want to text while on a WhatsApp video call. You will continue to see the Preview of your call in the top-right corner of the screen.
Did you know that WhatsApp has a range of shortcuts you can use? Check out our article on every WhatsApp Desktop keyboard shortcut you need to know.
How Much Data Do WhatsApp Video Calls Use?
WhatsApp's focus is to make your video call look as crisp as possible. So if your internet speeds support higher quality video, then WhatsApp will take full advantage. Unfortunately, that results in high data usage. If you're not on Wi-Fi, you can quickly go through a lot of cellular data.
On average, we found a minute's call to use around 13.1 MB of data on 5G. This isn't terrible, but it is enough to warrant keeping an eye on. A few Twitter users also recorded similar numbers.
To combat high data usage, WhatsApp offers a setting to reduce the data used on voice calls. If you're worried about exceeding your monthly data allocation, this option may help you avoid overages.
There's Much More to WhatsApp
Video calling is an essential tool, and WhatsApp has done an impressive job with it. In addition, the service is getting more stable and reliable as updates occur.
That said, WhatsApp offers many desirable features in addition to video calling. Overall, the service is more than just an instant messenger. With its range of features, WhatsApp is quickly becoming its own social network.
Source: MUO
Chrome Tabs Keep Auto-Refreshing? Here's How to Fix It
Chrome Tabs Keep Auto-Refreshing? Here's How to Fix It
Auto-refresh is irritating at the best of times, but it can seriously derail your workflow if left unattended to.
If you have a lot of tabs open, your system might run low on memory, so Chrome keeps refreshing those tabs. If you’re in a hurry to find a piece of certain information, you know how annoying it is to wait for a tab to reload.
Don't worry if it's getting on your nerves, though, because we'll discuss the solutions below.
Why Does Google Keep Refreshing Tabs?
Chrome uses a lot of your system RAM. So the browser is set to remove the data of any open and loaded tab to prevent high memory usage.
While it’s better to wait for a few seconds instead of dealing with a constantly slowing down, or even crashing system, it can be frustrating—especially if the auto-reloading tab causes you to lose your work progress.
Fortunately, there are a few tricks you can try to save your time and keep you stress-free when dealing with Chrome’s auto-refreshing tabs.
1. Restart Google Chrome
As always, when dealing with a faulty program, the first troubleshooting solution is to restart it. But simply clicking Close and relaunching Google Chrome might not fix your auto-refreshing tabs problem. Launch Task Manager and close any background process that Chrome is still running.
2. Check Google Chrome Extensions
Chrome comes with a lot of available extensions designed to improve your browsing experience. And if you can’t one that fits your needs, you can create your own Google Chrome extension.
While they make your life easier, sometimes browser extensions might lead to all sorts of issues, including auto-refreshing tabs. To fix it, click the three-dot menu from the top-right corner and head to More tools > Extensions.
There, disable all extensions and re-enable them one-by-one to identify the problematic extension.
If you have a lot of installed extensions and don’t want to go through a lengthy process, you can use Chrome’s built-in Task Manager. This way, you can check which extension is using a lot of RAM.
To access the task manager, open the browser’s menu and click More Tools > Task Manager. Once you find an extension or tab that hogs your system resources, select it and click End process.
3. Use an Extension
If your system has enough resources, you can install the Tab Auto Refresh extension to take control of your tabs.
Tab Auto Refresh allows you to set the time you want to automatically reload your tabs. So you can stop certain tabs from reloading for a long time or have them reload once every few seconds if you’re waiting for a big update or announcement.
To set the refresh timer, open the tab and click the extension icon. Then, you can put in the time interval to refresh the tab or completely stop it. Also, you can choose to reset the tab and bypass the cache when reloading.
Download: Tab Auto Refresh (Free)
4. Disable Automatic Tab Discarding
If you’re confident your system has enough resources but don’t want to install another extension, there’s a different method you can use to stop Chrome from auto-reloading tabs.
Head to chrome://discards to find a list of your active tabs. To stop one of the tabs from reloading when switching between them, uncheck the Auto Discardable option.
Keep in mind this is not a permanent solution. If you close a tab and re-open it, you’d have to go through the above steps again to keep it from refreshing.
5. Run SFC Scan
If you’re on a Windows computer, Chrome could keep auto-refreshing tabs because of a corrupt system file. In this case, running the System File Checker should fix the problem.
Launch Command Prompt with administrative privileges, type sfc/ scannow, and press Enter. Wait until the scan is complete and check if you can use Chrome without interruptions.
6. Reset Google Chrome
If you didn’t have any luck with the previous solutions, you can reset Chrome. Before doing so, keep in mind that it will remove every installed extension, history, and cache data.
To reset Chrome, navigate to chrome://settings/reset. Then, click Restore settings to their original defaults > Reset settings.
No More Auto-Refreshing Tabs
Hopefully, one or more of the solutions helped you fix the problem. Usually, Chrome keeps reloading tabs because of low system resources. If you run into this problem often, you should consider upgrading your computer or switching to a browser that doesn’t need so many resources.
Source: MUO
How to Remove Your Personal Information From File Metadata on Windows
Files sometimes contain metadata, that can reveal information about you if uploaded to the internet.
Here's how to remove it on Windows.
5 Ways to Check How Much Free Space Is on Your Mac
5 Ways to Check How Much Free Space Is on Your Mac
You can use any of these methods to find out how much available storage is left on your Mac.
How to Create an Email Group and Distribution List in Outlook
How to Create an Email Group and Distribution List in Outlook
Learn how to create an email group or a distribution list in Microsoft Outlook and see what a tremendous time saver it can be.
How to Set Up and Use iCloud on a Mac
How to Set Up and Use iCloud on a Mac
If you want to make the most of your Mac, you need to use iCloud with it. Here’s how to get started doing that.
iCloud is a staple of the Apple ecosystem. When enabled, the service allows you to sync data across multiple devices via a secure server. If you use several Apple products, iCloud is great for keeping important information up to date, such as contacts and calendar events. And if you drop your Mac down a well, have it stolen by a monkey, or see it meet some other ill fate, your precious data will be safe on a server somewhere ready for retrieval.
iCloud is a must-use feature for modern Mac users. So let’s look at how to set up and use iCloud on your Mac.
How to Create an iCloud Account on a Mac
If you already have an Apple ID account, you can simply sign in to iCloud via System Preferences > Apple ID and follow the prompts to set up iCloud. If, however, you don’t have an Apple account yet, you can create one, which you can do in the same location on your Mac.
Here’s how to create an iCloud account:
- Open the Apple menu and go to System Preferences > Apple ID.
- Click Create Apple ID.
- Enter your date of birth and click Next.
- Enter name, email address, password, and click Next. If you don’t want to use your current email, you can click Get a free iCloud email address and create a new one.
- Follow the prompts to complete the setup process.
Once you’ve created your Apple ID and completed verification, macOS should automatically sign you in to your new iCloud account. Eventually, you’ll see a prompt asking if you want to merge certain information, including contacts and calendars.
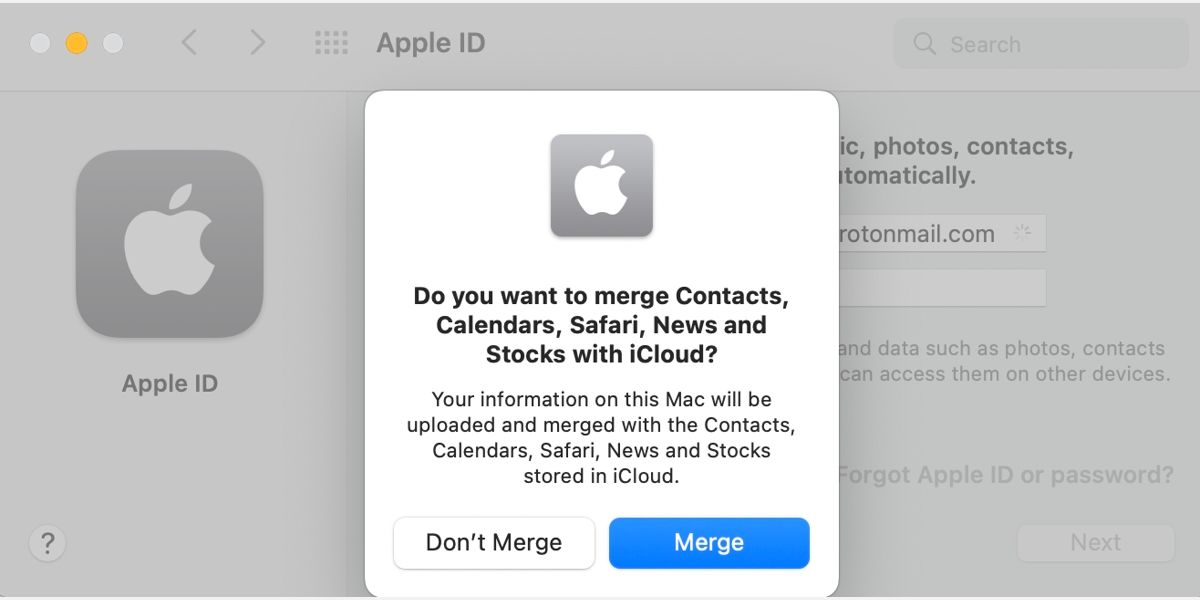
To begin syncing the listed data, you should select Merge. If you’d prefer to choose items individually, you can click Don’t Merge and continue the setup once you’re completely signed in. You can also opt to enable Find My Mac by clicking Allow when prompted.
What iCloud Features Should You Use on Your Mac?
Once you’re signed in to iCloud, you’ll see a list of features in the Apple ID System Preferences that you can enable. If you’re not seeing this list, you may need to click iCloud in the side menu.
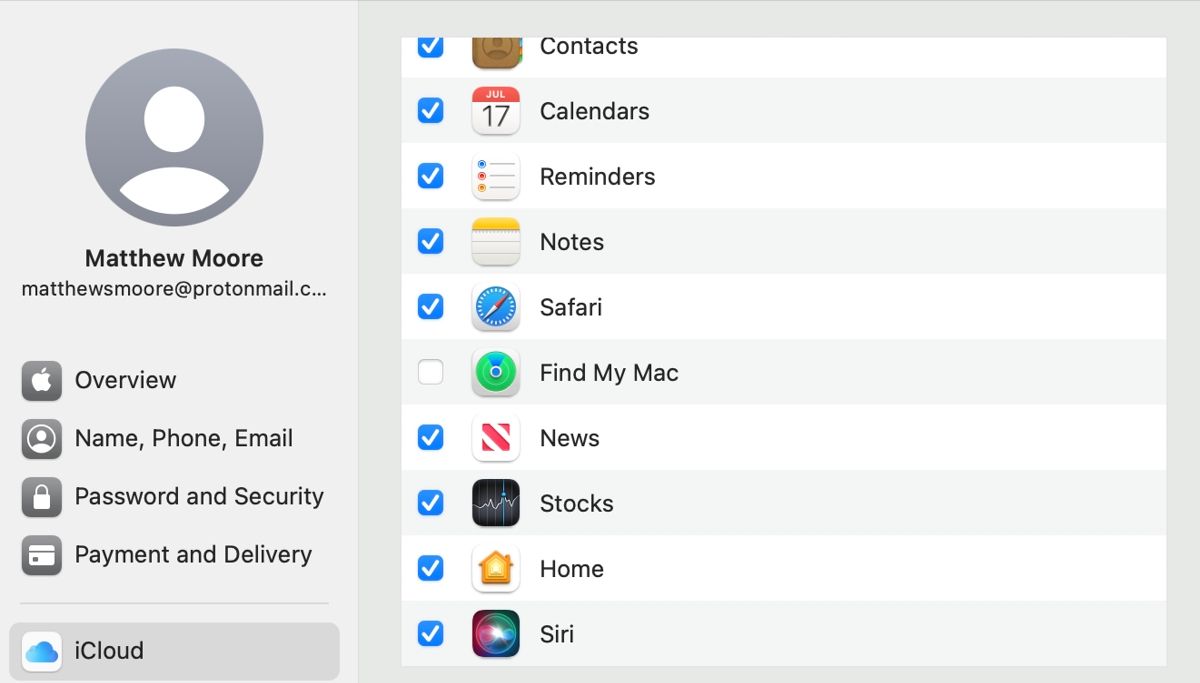
Deciding which services to switch on comes down to one simple question: What data do you want to sync with iCloud? If you don’t use some of the services listed, you probably don’t need to waste storage syncing them. With that said, most services won’t take up a lot of space, so you may want to switch them on anyway.
Let’s go over each iCloud feature so you can decide what’s worth enabling and what’s not.
Photos
With Photos enabled, iCloud will sync photos and videos with your other devices that have the service switched on. However, media content can take up a lot of space, so you may need to upgrade your iCloud storage if you have a lot of items.
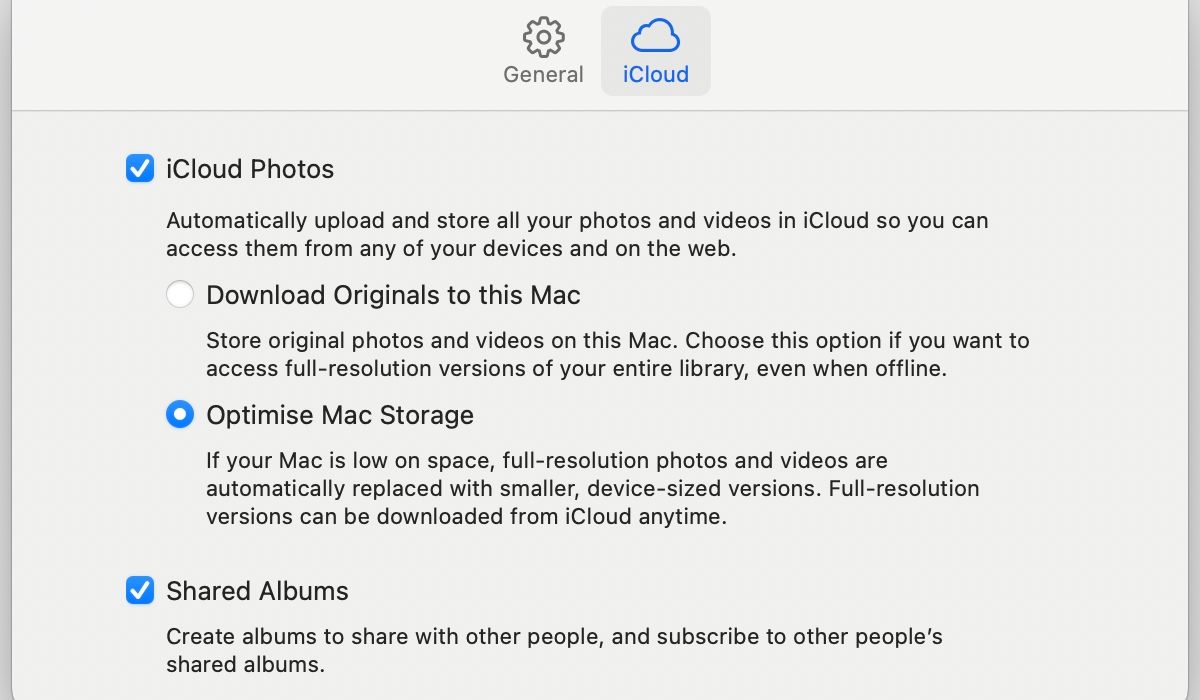
Once you have Photos enabled, you can adjust settings in the Photos app by going to Photos > Preferences > iCloud.
Keychain
iCloud Keychain is perfect for securely syncing your usernames, passwords, and billing information across multiple devices. You should, of course, only enable this feature on devices that you completely control.
iCloud Drive
iCloud Drive is like an online hard drive that you can use to store other important files, such as documents. The service is ideal for backing up any items you couldn’t bear to lose, especially if you don’t regularly perform a Time Machine backup.
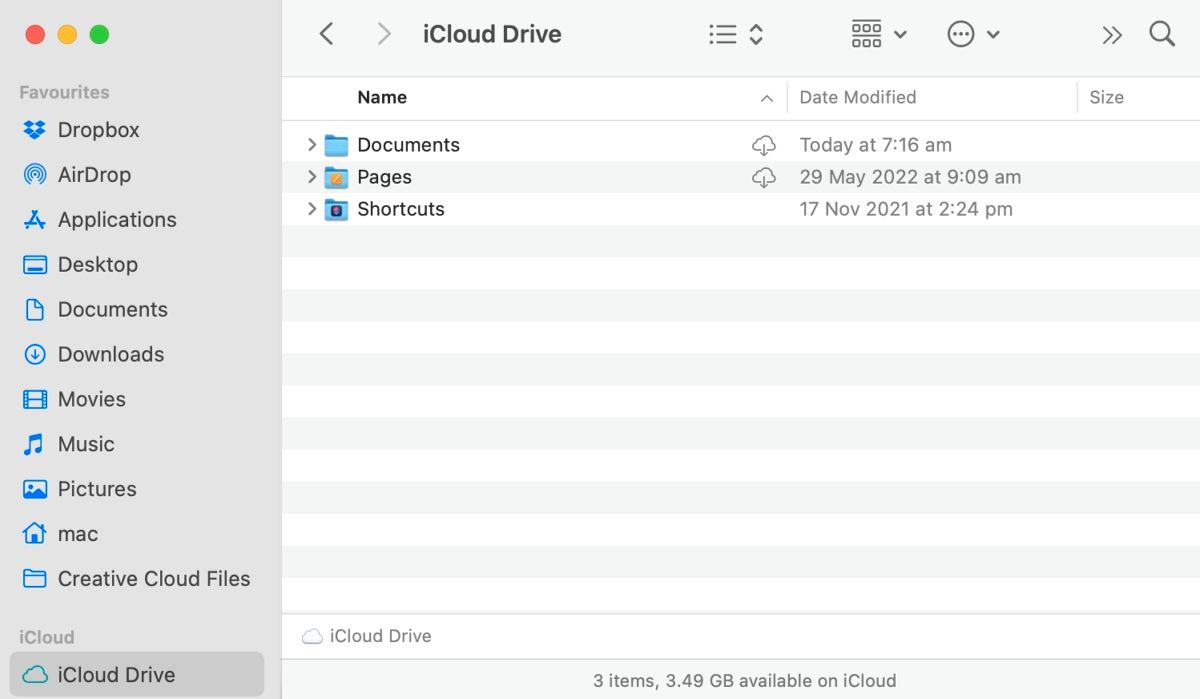
You can choose which additional items get stored in iCloud Drive by clicking Options in System Preferences > Apple ID > iCloud. To manually add files to the server, you can access iCloud Drive via the Finder sidebar.
iCloud Mail
Switching on iCloud Mail adds your iCloud email address to the Mac Mail app. If you also have iCloud Mail selected in your iCloud Drive options, additional settings, such as blocked senders, signatures, and rules, will sync to the server.
Contacts, Calendars, Reminders, and Notes
If you own multiple Apple products, keeping your Contacts, Calendars, Reminders, and Notes in sync across all devices is super useful. On top of that, if something happens to your Mac, all of that important information will still be available on the server.
Safari
Switching Safari for iCloud on allows you to sync bookmarks, reading lists, and open tabs across multiple devices. This feature is great for creating a seamless experience and boosting productivity.
Find My Mac
Find My Mac allows you to locate, lock, and erase your Mac remotely. In most cases, there’s no good reason why you shouldn’t enable this feature. If your Mac goes missing, at least you’ll have a chance of tracking it down or preventing some sticky-fingered thief from using it.
News
Enabling News in iCloud syncs certain information, including channels, saved stories, and reading history, to the server. If you read the news on multiple devices, this feature is particularly handy.
Stocks
Enabling iCloud Stocks syncs your watch list to other devices.
Home
When you enable iCloud Home, information about your HomeKit accessories syncs to the server for use with your other devices.
Siri
When you interact with Siri, its behavior changes based on your usage. Syncing it to iCloud lets you access your trained and personalized version of Apple’s AI assistant on multiple devices.
How to Upgrade Your iCloud Storage
If you find yourself running low on iCloud storage, you can always pay for more. Apple offers several iCloud payment plans to choose from. Here’s how to upgrade your iCloud storage on Mac:
- Go to System Preferences > Apple ID.
- Select iCloud in the side menu.
- Click Manage at the bottom of the window.
- Click Add Storage.
- Select a new storage plan, click Next, and complete the upgrade process.
iCloud Is a Must-Use Feature for Modern Mac Users
If you’re a modern Mac user, iCloud is an invaluable—and practically mandatory—tool of convenience. Syncing important information allows easy access from other devices and can help prevent data loss.
Source: MUO
How to Connect AirPods and Bluetooth Headphones to an Apple Watch
How to Connect AirPods and Bluetooth Headphones to an Apple Watch
You can rock out wirelessly using your headphones and Apple Watch in just a few easy steps. We'll show you how.


