

Apple has implemented an easy-to-use file-sharing system for its Mac systems, providing a straightforward way for Mac owners to share files, data, and folders with other individuals. Choosing what specific files and folders that can be accessed by users other than yourself is predominantly controlled by Mac’s Shared and Public folders.
Let’s take a look at how to share files with other people on a Mac.
Sharing files with the Shared folder
Putting files into the Shared folder on your Mac will allow any other user account on your system to view its contents.
Step 1: Open Finder. In the search bar, enter users and find and open the Users folder. Here, the Shared folder will show up. Open it.
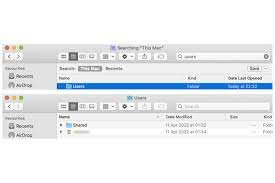
Step 2: Open a new Finder window. Drag and drop or copy and paste the files and folders you want to be shared with other users into Shared.
When another user on your Mac logs in to their account, they'll be able to view the files you placed within the Shared folder.
Sharing files with the Public folder
Another way to share files and folders with other people on a Mac is through the system’s Public folder.
Step 1: Open Finder, search for public, and open that folder.
Step 2: Copy and paste or drag and drop whatever you wish to be shared into the Public folder.
Customizing permissions for Shared and Public folders
Now that we’ve explained how to share files and folders with other users on a Mac, let’s take a look at how to customize specific permissions for both the Shared and Public folders.
Step 1: Open System Preferences and then select Sharing.
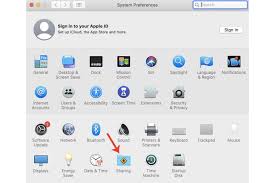
Step 2: Select the Public folder, which should already be displayed within the Shared folders section. The default settings assign read and write control (can edit and delete) to the admin account, while other users are set to Read Only.
However, by selecting a user’s Read Only field, the permission for that person can be changed to Read & Write as well.
Step 3: In the Shared folders section, select the + button and add the Shared folder. Follow step 2 and make any necessary adjustments you wish to apply in terms of who exactly has Read & Write permissions.
Step 4: If you want to share files and folders with other users on your network who are using another system as opposed to your own Mac, select the Options button, select the Share files and folders using SMB box, and select Done. The SMB address can now be used to share files on your Mac to another system.
Similarly, within that same window, you can also enable Windows file sharing as well for Windows-based systems.
Source: Digitaltrends


